Monday 22 June 2020

Automatic Battery Watering Timer Instructions for GS 709 Model from Banggood

This is something a little different, but linked to home automation, so I thought I would share my experience.

A few years ago, we bought an automatic, battery operated, watering timer for watering our plants. As always, the purchase was a considered one; with an eye to quality, reliability, ease of use, and, the driving factor: cost.

I'd only just started buying stuff from China (knowingly buying, that is, rather than not checking where much of our stuff comes from) and Banggood was in its infancy and offering some amazing deals. Of course, they still do, but back then the prices were more than a little competitive.

(Even after adding shipping, paying for insurance, and import duty, the timer cost much less than the high street equivalent).

No Instructions

This could be the reason for that low, low price: opening the package, there were no instructions. At least, not in English, and I don't happen to speak any of the oriental languages that the instructions were printed in.

So, I set about trying to find out how to make it work, and the result are these very useful instructions that you are welcome to download and try for yourself if you happen to have a watering timer that looks like mine.

Friday 21 June 2019

Robotic Lawnmower Perimeter Wire Installation Tip

I have written on this topic before, in my popular Robot Lawn Mower Perimeter Wire Repair Kit post. Regular readers will be happy to hear that the chickens are still causing chaos, and so it looks rather like I'll have to reinstall the wire after all.

Before I get around to that, my ongoing DIY projects have meant that, at the very least, I've had to move some wire so that I could install some decking.

Moving the Perimeter Wire

Why not just leave the wire there and let the mower bump up against the fence?

This question was from my wife, and it's a good one. The thought had occurred to me, too, but then I remembered the palaver I had to go through to replace the suspension rubbers (see my Damper Picture and Repair Instructions) and decided to try and preserve them a little longer.

I spun the mower onto its back over the weekend, and noted when I tried to unscrew one of the rubbers that it was twisting and flaking, so it looks like it's on the way out as it is, so probably best not to take any chances.

Of course, I couldn't find the wire, since I never did buy that wire detector for perimeter wire I promised myself, so after a bit of trial and error (okay, I could have just let loose the mower and noted where it turned around, but I didn't think of that), I finally located the cable and started digging.

Naturally, I cut through it by accident, despite taking as much care as I could.

As I was moving the wire, which meant shortening its path, a point occurred to me.

Adding Coils of Wire to Improve Repairs

I could have chopped off the excess wire and thrown it away. However, instead I wound it around the pegs; not all of it, just a couple turns here and there.

Why?

Not for any strange electrical reason. Simply this: when I next cut through the wire, as will surely happen, at least I'll have enough slack to make a decent fist of the repair.

There's nothing worse when you're trying to repair a cut wire than the ends not meeting, no matter how hard you tug them. This simple tip, winding around every other peg, means that you should always have wire available.

I can't believe I didn't think of it before; but I didn't. And, you might not have. So, I'm sharing it to help you out; let me know if it was helpful at all in the comments below.

Monday 17 December 2018

My 2018 Robot Mower Accessory Wish List

As it's winter time again here in the Northern Hemisphere, my thoughts turn to hibernating my robotic lawn mower and carrying out essential maintenance on the perimeter wire.

Even with the addition of chickens, it's holding up well, but I've noticed that they've managed to unearth it in several places. I'm holding fast with my decision not to concrete over the wire, though, preferring instead to put some small stones on top that the mower can roll safely over instead.

The reason for this is that if you cement the wire in, and it breaks, it's going to be hard to find the place where the break occurs, using the usual approach to repair a perimeter wire.

Repair Kits

First off, I've found a perimeter wire repair kit that has all the bits you'd need to carry out this essential maintenance:

  • cable (5m);
  • pegs (x10);
  • 'proper' cable connectors (look like four of the 3M ones).
While this is a great value package, it leaves one aspect out: locating the break in the wire.

Regulars at the blog will know that I have a tried and tested method for finding perimeter wire breaks, but if Santa is kind this year, I may well have an automated alternative.


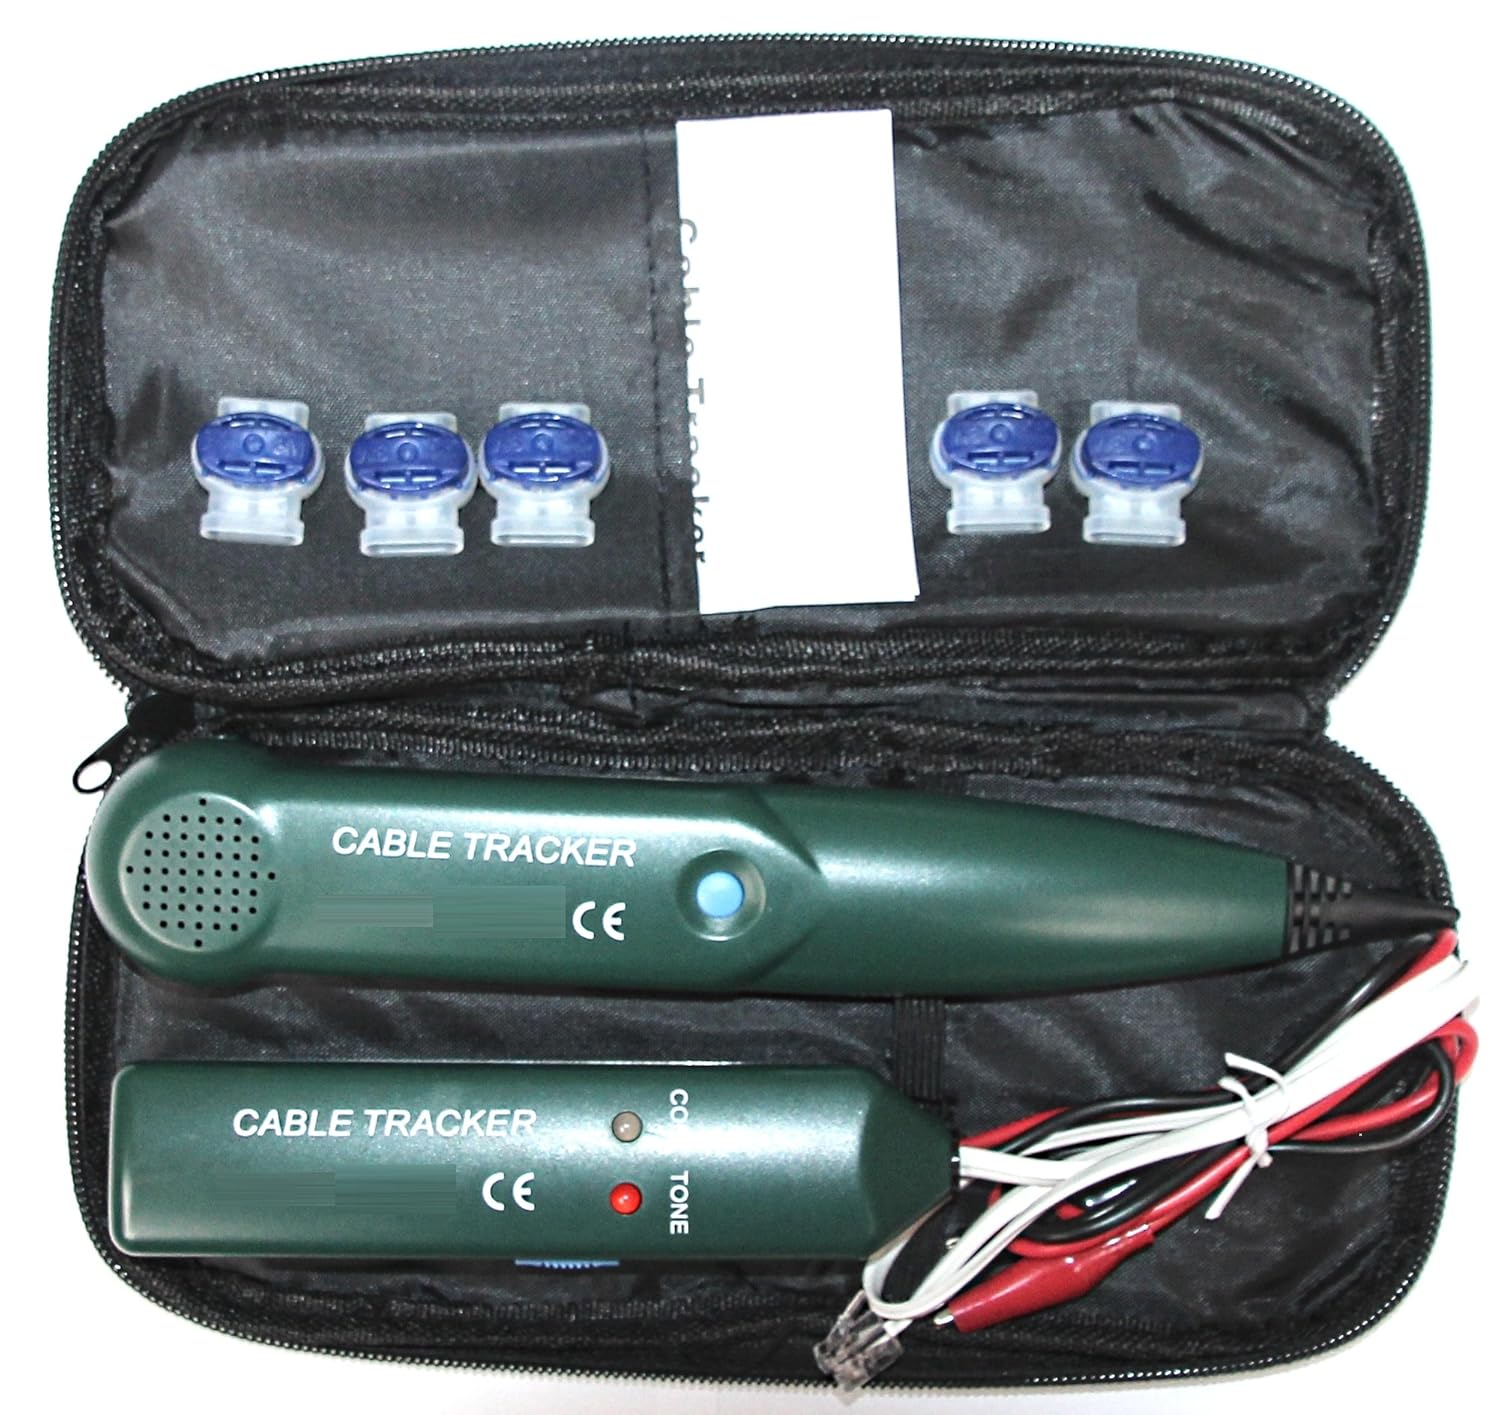
It's from genisys, maker of replacement blades and other accessories, and promises to take the pain out of finding the break.

Fair warning: I have no idea how effective it is, yet. I also don't immediately see how it works, but it looks similar to others that I've seen with a tone generator and detector.

An example is this one from Paradise Robotics (link goes to instructions PDF) and confirmed my initial idea that it works pretty much in the same way that the manual search and fix works, except that you don't need to unearth your cable!

Also, the single review on Amazon indicates that the instructions are less than perfect; the initial opening line of the Paradise Robotics instructions would seem to confirm this: "Please follow these instructions because you may find the instructions in the manual confusing."

The Cable Fracture Search Device comes in on Amazon at under £30 and as long as Santa feels generous, you'll get a review of it in the New Year. If you can't wait, click the link, and stop by here to let us know how you get on!

Blade Kits

Blades are always good to have around: certainly in my garden with all those protruding anti-chicken stones, falling branches, and so on, blades get broken quite frequently.

Following the manufacturers advice to the letter, I usually replace all three blades and screws at once to avoid unbalancing the spinning mechanism. Now, this might be overkill, but I've had 5+ years service thus far with nary a problem.

So, I was looking for some replacements recently, and happened upon a great deal over at Amazon UK: 30 blades for under £8.


Then I looked at the promo pictures.

At the bottom was the one you see over there on the right. Now, I'm not being funny but I'm not sure the advertiser necessarily understands what kind of mower the blades are for!

Unless, of course, you know any different, I'd say that the mower in the picture doesn't use the blades being advertised.

Again, subject to Santa's generosity, I'll provide a full review of these relatively cheap replacement blades in the New Year.

For a quick price comparison: Titans are about £14 for a pack of 12, and last year I did a full blade price analysis which still looks more or less right when compared to today's market. So, 30 for £8 is almost unbelievably cheap.

Other Robot Mower Accessories

From the low end to the high end, now: the traditional big ticket item of the season is the robot mower shelter. Typically, the branded ones are pretty pricey -- somewhere around the £130-£200 mark -- and aftermarket no-brand shelters from £50-£75.

That was the last time I looked (link goes to full comparison), and things haven't moved on much.

With that said, let's go from cheap to expensive...


Wiltec have a couple on Amazon, the one pictured here is the basic-looking than the one I'd originally selected, but has four stars rather than two.

What I like about this robot mower shelter is that it's easy to modify: the reviews mention a few hacks that have been required to allow access to the cables via the back, for example.

They're both £90 or thereabouts, and made in Germany, which seems to be the place to go for aftermarket robotic mower accessories.
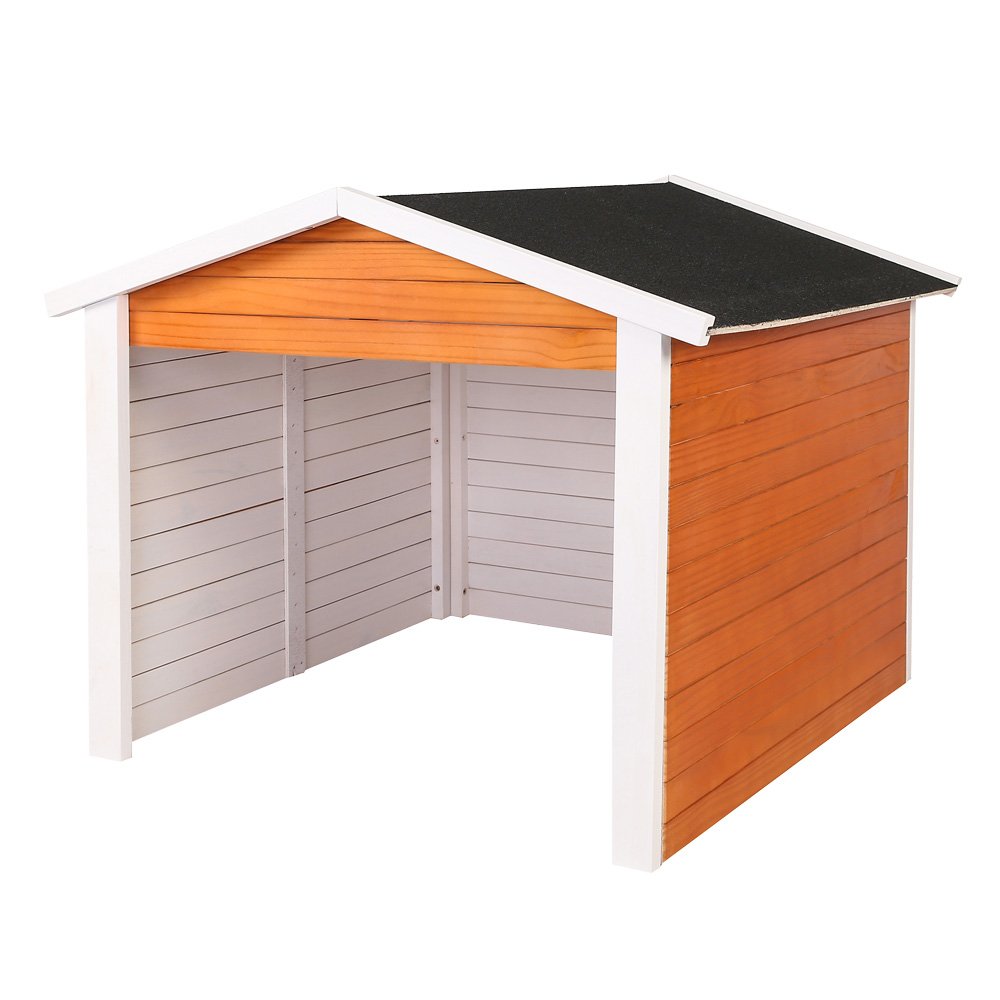
Next up is the Turefans Shelter for Robotic Mower, which regular readers will find looks familiar.


I believe that it comes as a flat-pack, which for under £50 isn't much of a surprise.

One thing I like is that it provides easy access to the back (and wires) of the mower docking station. What I like less is that it leaves the back and sides exposed to the elements.

The manufacturers advice for the R40Li (1200R) doesn't mention a need to protect the electrics, but in my opinion it's always better to do so.

Subsequently, my home-made shelter looks more like the Wiltec one above. Being wood, though, it's starting to suffer. Being home-made, it's also starting to fall apart!

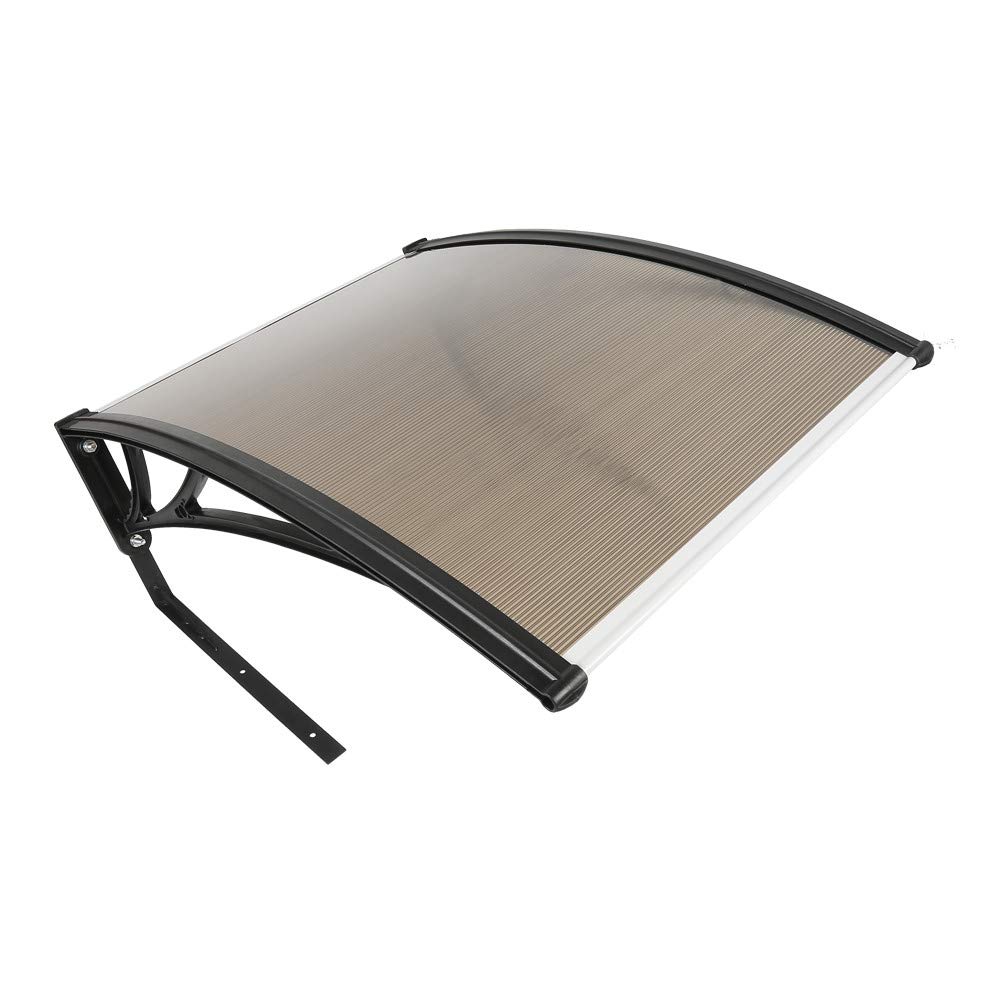
Which brings me to the final robot mower shelter, from German maker LED Design Shop.


It's actually called a Robot Lawn Garage, a suitably upmarket sounding moniker for a £200 shelter.

They're available in 2 sizes, and as in the photo, three colours: black, white and transparent.

The material appears to be some kind of high impact acrylic, with, according to the description, a 30 year guarantee.

Here again, my only real issue is getting to the back of the mower, where the connectors are. The base unit will fit under the shelter, and the rear panel doesn't quite touch the ground, leaving space for the wires to trail out of the back.

However, if you ever want to get at the base unit, once the shelter is installed (to clean the contacts for example), it'll be pretty tricky.

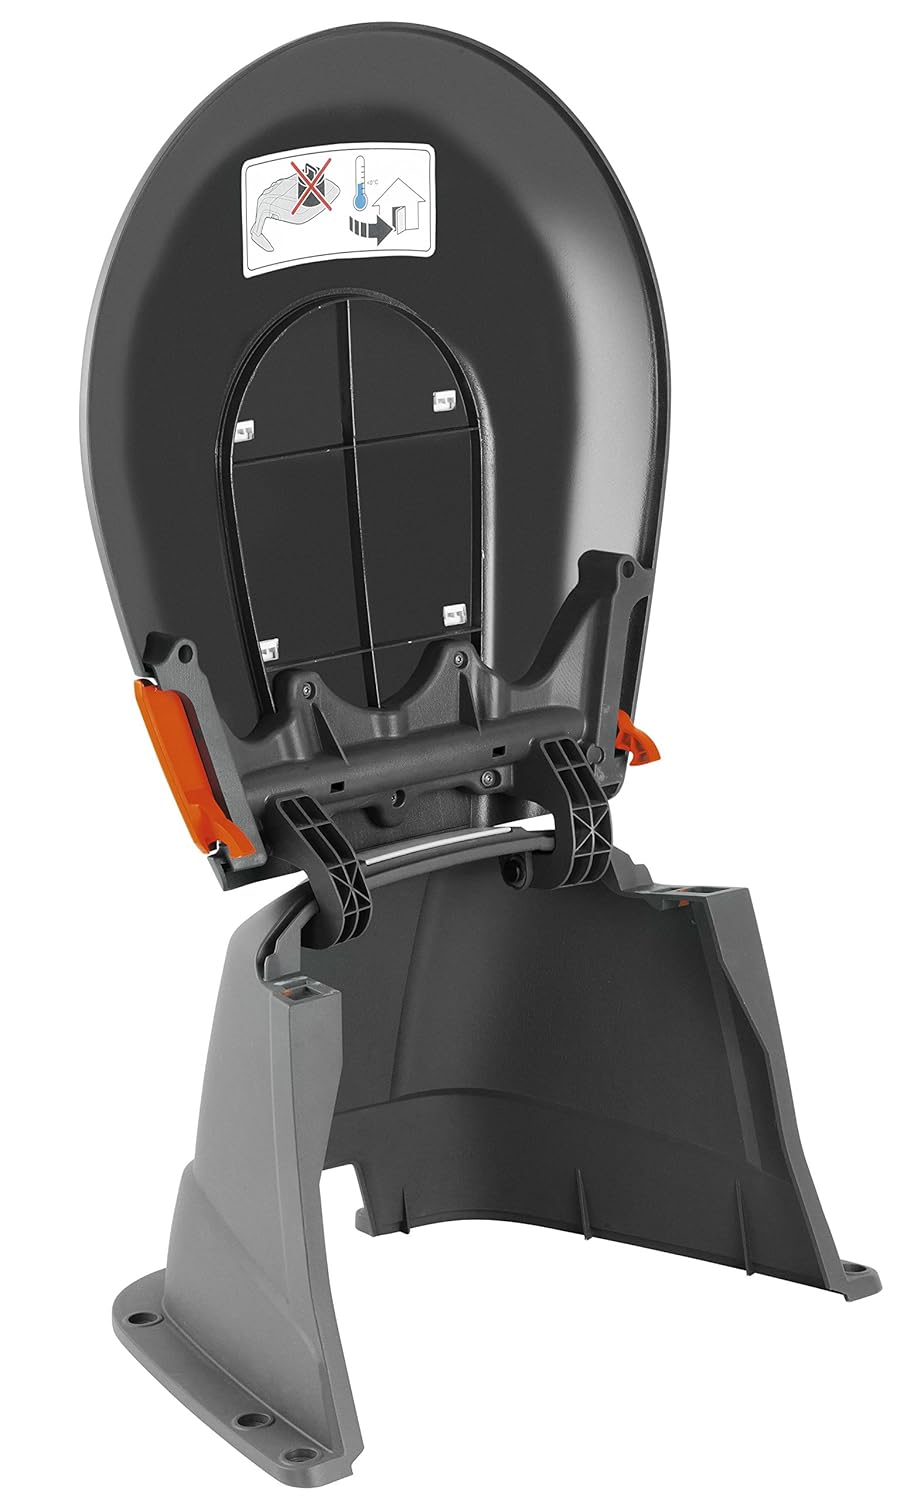
Compared with, for example, the Sileno City shelter from Gardena (pictured), which flips up like a toilet seat (forgive the analogy), most of these shelters seem to be missing a trick.


When you'e paying sub-£50 that's forgivable, but not if you have to part with almost £200. Perhaps just a hinged door at the back, or a slide-off roof could be the answer.

Any budding designers out there, take note!

Anyway, I'm not going to rely on Santa to drop one of these in my stocking; I'll be on the hunt into the New Year to see if I can pick up a bargain in the sales. Failing that, I'll be back out in the garage trying to cobble up my own shelter come Springtime.

Happy Holidays!

Tuesday 24 April 2018

Robot Lawn Mower Perimeter Wire Repair Kit: Tips & Product Advice

While researching an article about aftermarket robot mower blades I cam across a pack that had all the bits in one place: screwdriver, blades and new screws. Now, it seemed obvious to me that the next most obvious kit would be a perimeter wire repair kit, but I've not yet found one.

So, here is my own list of things that you would need to put together such a kit, based on bitter experience of:

  • chickens digging up the wire;
  • having to move the wire due to 'garden redesign';
  • natural breakage due to corrosion;
  • expansion of the mowing area, etc.

Even once you have installed the mower and its perimeter wire, it is likely at some point that it will break, be broken, or you'll have to move it. So, it's sensible to have a troubleshooting and repair kit to hand.

Wire & Quick Splice Connectors

The first thing to note is that while there are many different vendors of wire, with each specifying the make and/or model of mower that they should be used with, I have had good results with both single and multi-strand off-the-shelf wire.

Single strand (solid) wire can be easier in some cases, bit is very rigid: originally my own Gardena (Flymo / Husqvarna) mower came with a supple, green, multi-strand cable. However, I have since extended with a mix, and also carry a 'flying wire' for use in troubleshooting breaks in the perimeter, which is single strand.

For those who want some inspiration, Amazon carries a number of different types of wire specifically made for use with robotic lawn mowers.

One of the more specific things I have in my repair kit is called the "quick splice" connector.

Pictured on the right is the type that I favour -- these are used to clip onto the perimeter wire at a specific point, and then attach a 'flying wire' via a spade connector.

In my case, their purpose is not as a permanent way to connect the wires together (see below for that) but when I need to find a break in the wire.

Often, I'll leave them in place as it's more hassle than taking them off, and I suspect that removing the clip from the wire may leave it open to corrosion.

On the other hand, five years have gone by since I hooked up the first one, and took is off again, and I haven't had a break in the same place since. Regular readers will remember that I've had other breaks to repair, but none thus far due to rusting.

Pegs

One thing that also crops up is the need to re-position the wire on occasion.

I find that when I do this, inevitably some of the pegs break. When I eventually run out of pegs -- I bought replacements from the shop before researching replacement pegs online, rookie error -- I'll buy some different types and see if there's anything to choose between them.

Here's what they look like:


Those of us with the Husqvarna/Gardena/Flymo mowers will be familiar with the hooks on the right, which have the tendency to pop out easily when you need them too. However, I've had a few issues keeping the wire underneath the hooks at the end.

That's where the Bosch style pegs have the edge. It looks rather as if you can loop the cable underneath the hook, and around the peg, making it more secure.

On the left is an unknown (to me) brand of peg. The advantage looks to be that they will stay in the ground more permanently, and there is a flat top holding the cable close to the ground.

Whichever you choose, make sure you have a few in your repair kit!

Permanent Perimeter Wire Connectors

Above, I mentioned that I have a collection of quick splice (spade type) connectors to get me out of a bind when I need to test the conductivity around the perimeter wire.

However, on occasion, it's necessary to replace a section of wire, or to re-position the central guide wire, also known as the return wire.

I wouldn't trust quick splice connectors for something permanent, preferring instead to go with the type of connector seen on the left. These are filled with a liquid to protect against moisture and dirt.

The blue one, and some of the red ones are made by 3M, and those are what I bought as 'extras' from the same place I got the pegs. This was before I shopped around.

It turns out that Amazon has a good selection of connectors. Wherever you buy them, I would advise having around 5 just in case the worst happens and you need to splice together two or three perimeter cable ends!

Keeping it All Together

Finally, some additional bits and pieces:

  • a hammer for the pegs -- I prefer a rubber head one;
  • pliers and cable cutters;
  • wire stripper
  • ...and a box to keep everything in!

Stanley, make a small, robust toolbox for only about £15. I've tried to keep everything in plastic bags, or in my regular toolbox, but bits go missing (presumably borrowed!) or I use them for other projects; in the end, I bought a dedicated toolbox and I advise you to do the same!

If you have any other tips or tricks for lawn mower perimeter wire maintenance, please let us know in the comments section below.


Friday 20 April 2018

Replacing the R40Li / 1200R / Automower Battery (Pictures and Steps)

As regular readers will know, our trusty Gardena R40Li has just entered service in its fifth season!

Also known variously as the Flymo 1200R, or Husqvarna Automower, this model was one of the first automatic robotic lawn mowers on the market, and still stacks up reasonably well against the competition.

However, after 2649 hours (see right), the battery had started to fail. The symptoms were fairly obvious:
  • Frequently returning to the base after only a few minutes;
  • Stopping cutting on manual, when battery showing half full.

In fact, some of the symptoms started towards the end of last season, but a couple of refreshes seemed to (temporarily) help. For this season, though, I decided to bite the bullet and replace the battery.

Over the intervening years, the poor mower has become a bit encrusted with old grass.

This is my own fault, as detailed in my rubber damper pictures and repairs article: I don't take as much care over cleaning as I should.

Luckily the battery compartment cover is easy to find; it sits between the rear wheel (bottom) and spinning plate that holds the three blades (top).

After a bit of scraping to reveal the screws (right), it becomes obvious why the instructions say to drop the cutting disc as low as possible.

Even though (as can be seen in the photo), the screw heads are accessible through the holes, once released, the cover needs to be lifted and slid out.

This is much easier to do if you first drop the spinning disc to it's lowest position, or minimum height, if you prefer.

The screws are, again T20 Torx, which ought to be familiar to anyone who has tried dismantling the auto mower already.

Once removed, the compartment cover reveals three things.

Firstly, there's the battery itself, complete with velcro tab to pull it out of it's moulded compartment.

Secondly, there's the USB port on the left, which I had not previously been aware of, but which I'm guessing would theoretically allow you to mod the mower.

A quick visit to the Gardena site reveals that for the Sileno and Sileno+ models at least, there is also a software update available. The download page redirects to Husqvarna and prompts to install an application, check the connected mower and update the firmware.

Something for a future post.

Meanwhile, the third thing to note is that it remains, despite external appearances, incredibly clean inside the battery compartment.


This is a testament to the rubber seals. Seals which, unlike the rubber dampers, stand up to the constant abuse.


On the left hand side of the page, there are the two batteries.

The one at the bottom is the new one, purchased on Amazon (see "r40li battery"). There were several to choose from.

Bang in the middle of the range of prices, was the one that I eventually bought, made by VHBW, apparently, and rated more or less at the same power as the original.

At the top end of the scale, costing over £100 is the a replacement made by Husqvarna; having read some reviews of the VBHW, I decided that it was worth the "risk".

At the lower end is a replacement at around £45, which just felt a little too cheap -- but I should point out I have only gut feeling to go on, and no basis of any other informed opinion!

I'd give it a shot, if I hand't been an early adopter of the robot mower revolution, and spent top whack for my trusty R40Li. If anyone has tried the cheaper batteries, or can convince me that they're not going to damage my 'bot, let me know.


The last step is just to drop the battery into place, wonder for a last time what that USB socket could be for, and screw the lid back on.

Care is needed to plug the battery into place, as the connector is a tight fit, but other than that, the replacement itself is an incredibly easy job.

The mower reported that the battery was about half full, but it returned to base quite quickly. Perhaps it should have been charged first.

However, the subsequent mowing period was substantially longer than with the old battery, which is a good sign. Only time will tell if the new battery performs as well as the original - over 2500 hours of mowing in a 5 year period seems like a pretty hard act to follow!

Previous articles on R40Li maintenance:


Thursday 29 March 2018

Robot Lawn Mower Shelter Reviews

It had to happen: there's now an active market for robot lawn mower shelters.

Although each make usually sells its own shelter to go with a specific mower, these can be quite expensive. Not to mention the fact that, since prices are coming down, and anything mechanical will eventually fail, you might not necessarily want to replace your existing lawn mower with one from the same manufacturer.

Even if you did, the chances are good that the existing shelter wouldn't be compatible.

The following selection of robot mower shelters are designed to work for most brands. While it's also possible to make your own DIY lawn mower shelter, for most of us, it's just easier to buy one off the shelf.

However, let's start with one that almost looks as if it could be made by measuring up, buying wood, and spending a weekend in the shed with an array of power tools...

This German made wooden mower shelter looks a bit like the first one that I knocked together for my own Gardena/Flymo/Husqvarna (same model, different country variations).

It's also not cheap, either, at around £90 including delivery, and much the same effect could probably be achieved by a skilled weekend DIY-er.

For the rest of us, though, it's a viable option: but you will need to drill some holes or even cut some of the rear away to accommodate the mower's charging station and connecting wires.

At least with wood, that's an option. However, take a look at the next example, again German-made, but this time a stainless steel robot mower shelter, priced at £230 to £260 depending on delivery options.

This puts it at a price point slightly ahead of the competition, including branded options. On the plus side, though, it is built to last, and can be bolted down to the ground.

Where I'm a bit concerned is with those charging stations that need space at the rear for wires. The steel probably wont't be easy to cut through, and the overhang may leave the mower partially exposed unless the charging station can be pushed right up against the back.

Next is the slightly cheaper Robohome Universal Garage.

This is a £200 self-assembled, low profile shelter that is designed to blend in rather than stand out.
br/>The effect works, and is pictured here housing the ubiquitous Gardena/Flymo/Husqvarna entry-level mower.

One advantage with this model, and others like it, is that since it isn't fully enclosed, there's plenty of access to the rear plate of the charging station, so installation should be that much easier; especially if the charging station was installed some time ago and has become part of the lawn!

This is even more apparent with the next model, pictured here, from WilTec, a standard robot mower carport with sun protection.

It's even more low profile than the Robohome, but is a little larger, designed to accommodate all sizes of robot mower. To give you an idea, the roof is 103cm x 77cm and it stands over 40cm tall.

Luckily, it comes with some long nails to help hold it down! It is also democratically priced at £95.

However, take a look at the final item -- the VidaXL weather resistant lawn mower garage -- doesn't it look somewhat similar? The measurements are also pretty much the same, as is the styling. The roof may be made of a different material -- it looks more opaque -- and the unit is listed as self-assembly.

With all that said, the one thing you can't quibble is the price: at £40 it's the cheapest one here, and for light weather-proofing looks to be the ideal solution. Now, where did I put my credit card....?

Friday 22 September 2017

Ambrogio L60 Review, Manual, and Comparison to Flymo, Miimo and Yard Force Automatic Lawn Mowers

The Ambrogio L60 is a different kind of robot mower.

It's a mower for people who don't want to mess with full-on automation.

There's no boundary wire, for example. Nor is there a charging station.

In essence, this is a mower that replaces a person, even down to the fact that it can only really mow when you can be bothered to take it out of the garage.

Ambrogio L60 Features

For all that, it's a clever box.

It can tell the difference between grass, and not grass; coupled with bumpers that help it figure out if there is an obstacle such as a family pet, small child or tree.

The mower has 4 wheel drive, and can mow for about 3 and half hours on a three hour charge. It just can't get back to it's refuelling point by itself.

That means that if your lawn is big enough that 3:30 of cutting leaves some areas untouched (bearing in mind that the mower covers the ground at random), you have to pick it up, take it inside, and charge it up.

The advantage is that installation is easy. You just drop the mower in the middle of the lawn, press a button, and go about your business.

Ambrogio L60 Manual

The Ambrogio L60 Manual is one of the clearest, and easiest to follow that I think I've seen.

However, that's not surprising, as the robot mower is pretty much plug-in-and-go. There's no messy perimeter wire installation, and for those with a simple garden, not much extra landscaping to do.

On the other hand, it is clear from the manual that if you have ponds, walkways, and flower-beds, that you need to make sure your garden is up to the job.

There are some pretty tight guidelines for things like the height of delimiting curbs, and the kinds of materials that the Ambrogio will recognise as 'not grass'.

The screen needs very little explanation: it's so basic that there's nothing more than some descriptions about starting, stopping, and charging the mower.

The manual, is, in short, as complicated as it needs to be for a device that is clever, yet pretty dumb.

Ambrogio L60 Price

Here's where I have a problem. Price-wise, the L60 sits somewhere between the Flymo 1200R (which I own) and the es of the Honda Miimo or Yard Force machines.

The blades are non-standard, making them more expensive to replace.

For a machine that needs so much manual intervention, I find that the £1,500 plus price tag is a bit excessive.

However, the manufacturer would probably cite the admittedly clever technology that powers the robot in their defence. I have a friend with an earlier model, and for what it's worth, it works.

I just think that, for me, I'd rather have the mower on-call 24/7 than have to haul it around between charges.

Then again, I enjoy messing around with the perimeter wire, too. That's not for everyone; perhaps the Ambrogio L60 will find a market with the less technically inclined gardener whose garden is large, with complex shapes, and yet with well defined boundaries...